Getting Started with the Software using an Example – Price Tags with Barcodes
This guide introduces you step by step to Barcode Forge and uses a real-life example to show you how to use the software to print price tags with additional elements such as barcodes and product images.
Barcode Forge offers three ways to print price tags, labels, and other types of media:
- printing individually or in series
- printing in automated single-print mode (e.g., by entering or scanning a product code)
- printing from third-party applications (e.g., POS systems, inventory management, ERP). This requires the "Developer Edition" of the software.
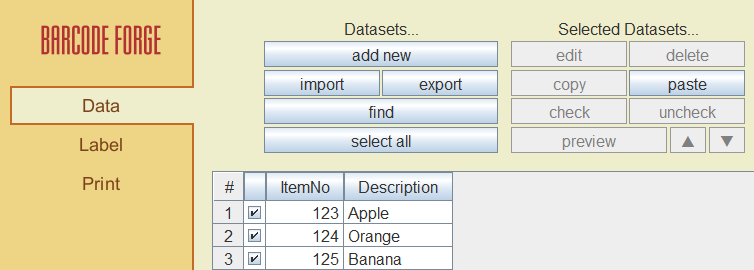
The software conveniently launches with a template that requires minimal adjustments to quickly create basic price
tags with barcodes and other product information. The Data section provides three sample datasets, the
Label section is where you edit the layout, and the Print section offers a preview of the resulting label
among other features.
Adding Price Information to our Price Tags
Price tags need price information, which is currently missing – let's add it in the next step.
1. In the Data section, right-click on "Description" in the table header and select
Insert new column to the right from the context menu. Enter "Price" as the name for the new column and confirm
with OK. Then assign a price to each of the three items by editing the datasets one by one
(e.g., right-click → "edit" or double-click).

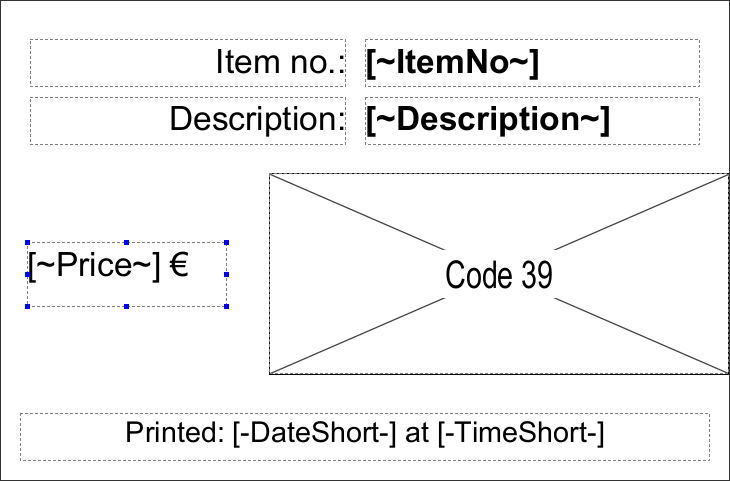
2. Switch to the Label section and create space for the price information by moving the barcode from the center to the right edge.

3. Now click the text object button T, then click in the newly cleared area and drag with the mouse button held down to create a new text object of the desired size.
4. Open the text object properties (right-click → "Edit"). On the Text tab, delete the "Text" entry
from the input field. Click Insert data field and select [~Price~]. Optionally, you can add a currency
symbol at the end of the line, after which your price tag layout should look something like this:
The price tag is now complete in its initial design. In the Print section, you can view the price tags for all
three items in sequence by navigating through the datasets:
![]()
Summary: This section demonstrates through the price tag example how data and layout are combined in the software.
Automated Printing of Individual Price Tags and other Types of Labels
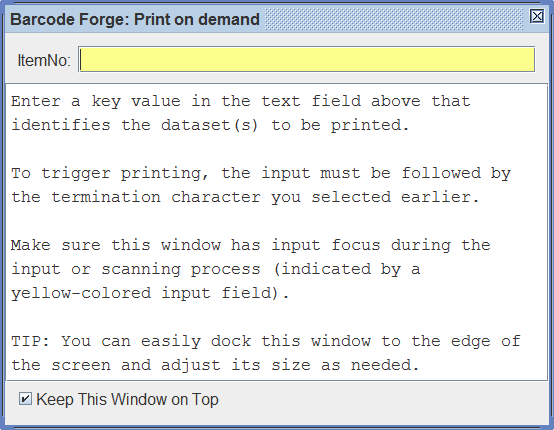
In practice, it's often necessary to print individual labels quickly and automatically, with the printing process initiated directly by scanning a barcode or entering a number via keyboard. This is particularly useful in retail operations where price changes require new price tags.
For such cases, the software offers a special print mode called "Print on Demand". In this mode, you can print price tags automatically by simply entering or scanning the product code.
To use this, click PRINT in the Print section and select "Print on Demand". Configure the settings as desired and follow the subsequent instructions. The program window will be replaced by a smaller window that accepts your input:
Choosing the Right Barcode Type for the Price Tags
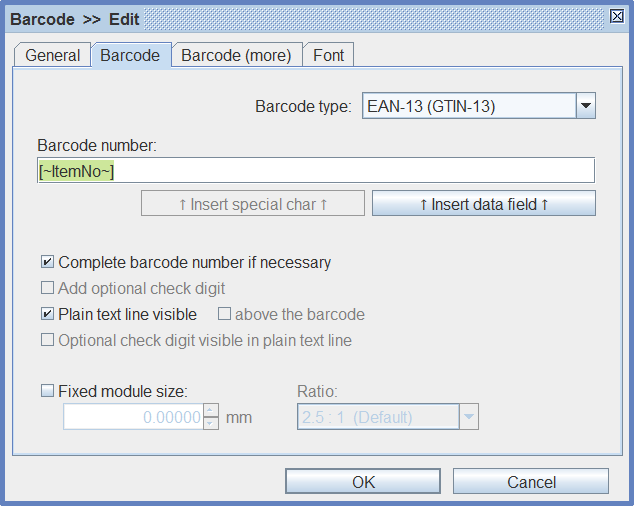
In retail and other sectors, price tags often include barcodes. The most common types are EAN-13 and EAN-8, which encode 13- and 8-digit globally unique product numbers (EAN). Only in a few countries, such as the USA and Canada, are the related and similarly structured UPC-A and UPC-E barcodes used instead, encoding 12- and 8-digit product numbers.
Additionally, many companies use internal product codes, for which other barcode types are often more suitable. Common choices include Code 128, Interleaved 2 of 5 (ITF), and Code 39, particularly because they can encode numbers of any length.
In the software, you can choose the appropriate barcode type for your requirements by right-clicking the barcode object, selecting "Edit" and navigating to the "Barcode" tab:
Adding Product Images to the Price Tags
Finally, let's add product images to our price tags. The steps are similar to adding the price information in the first section:
1. Data section: Add another column to the table, e.g., named "Image". Enter the file names of the images, e.g., "Apple.jpg", "Orange.png", etc. Ideally, all files should be in the same directory. Otherwise, full file paths must be entered.

2. Label section: Create a new graphics object by clicking the corresponding button and drawing a new object
as practiced before. Open the object properties and enter the file path according to the following scheme:
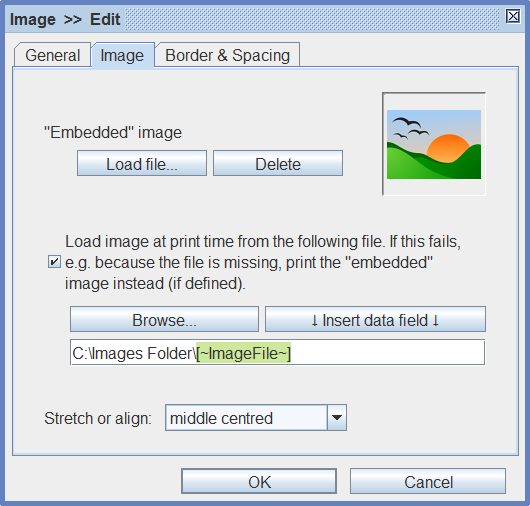
The images are loaded from the hard drive when printing the price tags, but they also appear in the preview in the Print section.
Need help or have questions? Feel free to contact us through our support!